
On Photography
|
On the basis of my experience, I presume to offer a few suggestions to the beginning city photographer. Even if you are an experienced photographer, you may find some useful ideas here.
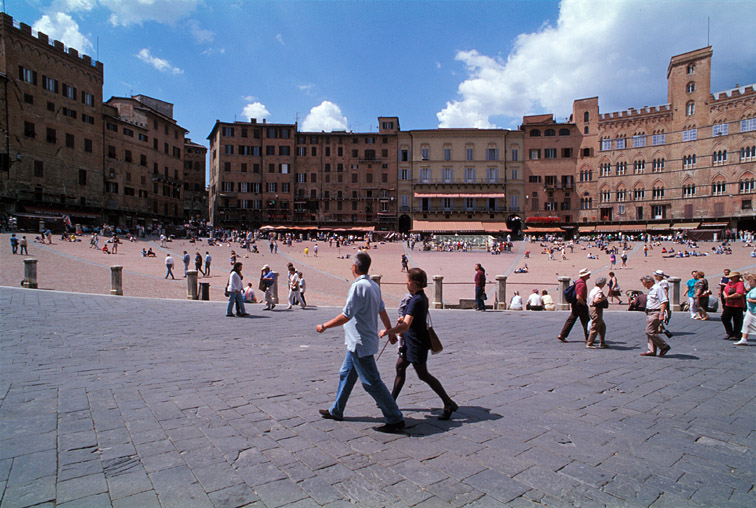
Do not buy a film camera today. Buy instead a modern digital SLR, which will pay for itself in saved film and processing costs in the first 5000 shots. Get a wide-angle lens with a diagonal angle of view of 90° or more. The extremely wide view is necessary because many locales do not permit backing up enough to include the desired elements. There are advantages to using a single, fixed-focal-length lens for all work, as the viewer becomes accustomed to the perspective. However, modern zoom lenses have become so good that it is now difficult to find a wide-angle lens for a digital camera that has both the necessary angle of view and an image quality that is at least as good as a zoom lens. I prefer cameras with the standard 3:2 aspect ratio of conventional 35mm cameras. Many digital cameras have instead a 4:3 aspect ratio, which is less useful, as it is normally the width of the scene that is difficult to capture, not the height. I have a lifetime of satisfactory experience with Nikon equipment. Canon is also highly regarded by serious photographers. With practice, a very wide-angle lens can be hand-held at a shutter speed of 1/8th of a second, which makes a tripod unnecessary in most cases. It is not necessary to focus each shot. Instead, use the hyperfocal scales, as explained in any text on photography. Everything more than an arms-length from the camera will be in focus. (When focusing is necessary (as with lenses or zoom lengths that are not so wide), the auto-focus mechanism will normally find better focus than you can achieve by hand.) I find that a good digital SLR can be trusted to handle exposure and white balance automatically except in very unusual situations. When a camera is set up in this way, shots can be grabbed in a moment, before the moment passes. The camera will operate faster if you depress the shutter release part way as soon as you have the shot approximately framed. Pressing the rest of the way will then give a nearly immediate exposure, which is essential to well-timed shots. Use of the camera must become second nature. Since digital photographs have no film and processing costs, simply start shooting and pay attention to what went wrong. Photograph during the spring and fall if possible, as there are some leaves on the trees but the buildings are still visible. Summer is fine in treeless areas; otherwise, your photographs may look more like forests than cities. Winter sun strikes at a low angle and gives a harsh light; when it is cloudy, the sky is often leaden, which produces dull photographs. A thin, high overcast is ideal (at any time of the year), as it gives a diffuse light that brightens the shadows and reduces contrast while still giving some blue to the skies. I realized while reading Alexanders discussion of the "generation problem" that it is not only architecture and city design problems that are susceptible to solution by following the right sequence of design decisions but also photography. I will describe here a sequence for photographing city streets. The first choice is where to stand. I think that, with few exceptions, the kinds of photographs in this book are best taken from eye-level while standing in the street, because this is the vantage point of those using the street. However, the exact choice of the place to stand has a huge impact on the result. I try to separate as many details as possible and can usually walk directly to the spot where I want to stand. I try to keep street lights clear of buildings and to keep the eaves of one building from cutting into the facade of another. (Often these things cannot be avoided, in which case it is important to make sure that the overlap is large; what is most jarring is a separation that just fails; one that just succeeds is often very pleasing.) Remember that details near the camera have more impact than more distant elements; if compromise is required, usually it is the more distant object that must be sacrificed. Choose your position before raising the camera to your eye. (If you use a single fixed-focal-length wide-angle lens, you will soon know the angle of view without needing to consult the viewfinder.) Once in the right position, raise the camera to your eye and determine what will be at the left and right edges; crop in the camera. (It is essential to have a camera with an accurate viewfinder.) Then level the camera from side to side. Next, level the camera up and down by aiming the center of the viewfinder at a point directly opposite you (many viewfinders have a helpful mark at the center). If the ground is level, aim at the eye level of another pedestrian. Check to see that the photograph is well framed. Pay attention to the edges; the center will take care of itself. With practice, this all takes just moments. Now it is merely a matter of waiting for the right instant to press the shutter. Part of this will depend on your objective. If you are trying to show life in the street, then you will pay the most attention to what people are doing and how they are interacting. If your objective is to show off the street itself most clearly, you will want to wait until people are not obscuring any important feature. In the main, it is the intersection of the pavement with the building facades that should not be broken in too many places. As the people begin to arrange themselves in the frame in a satisfactory manner, it is time to pay attention to the precise timing of the exposure. Generally, you will want to watch the people near the camera. People walking towards you are more interesting than those walking away. Try to take the picture when those who are walking have both feet on the ground, with their torsos centered between. |
|
Study the photographs of Henri Cartier-Bresson for good examples; he never published a photograph with imperfect timing. It will take practice to anticipate the decisive moment to press the shutter release.
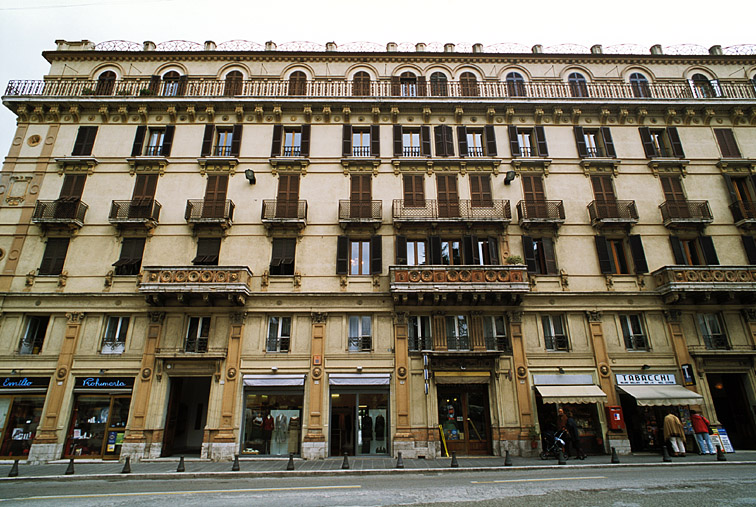
Do not move the camera after making the exposure. Try to judge, in the first instant after the mirror returns, whether or not the people in the frame were arranged as you had intended. Check to see that the camera did not drift out of position and spoil your framing. Just take another shot if necessary. With digital cameras, it takes but a moment to view the image on the LCD screen if you are uncertain of the result. If you follow this process and concentrate on your timing, you will soon find that you are taking good photographs, and before long, you will be able to take hundreds of publishable photographs in an afternoon (assuming a rich environment like Venice). You may never become an artist, but there is no reason that most people cannot become competent photographers. I rarely use a photograph if it looks like someone in it resented being photographed, and never if anyone actually objects. I do try to include people, as they give a sense both of scale and how the space is used. They make the scene much more interesting. Photographic TechniqueWith few exceptions, my photographs are reproduced from the full original frame. Contemporary photographs have not been retouched in this work except to correct technical defects (such as scratches).Until 2005, I used two Nikon F3HP cameras and four wide-angle Nikkor lenses: 35mm ƒ2, 28mm ƒ2, 24mm ƒ2.8, and 20mm ƒ2.8. The 20mm was used for most work after 1997. These cameras were not used after 2004. Photographs from 2005 and later were taken with a Nikon D70 and a 12-24mm DX ƒ4 zoom, nearly always set at the 12mm focal length. A handful of photographs were taken with the same lens on the much more satisfactory Nikon D300, which has an accurate viewfinder and has much less shutter lag. Most wide-angle lenses for SLRs, including those I used, exhibit perspective errors, typically "barrel distortion." Both my 20mm lens and the new 12-24mm zoom when used at 12mm give the complex and disturbing "moustache" distortion, as seen below. |

| This error can be substantially removed using Panorama Tools in Photoshop, giving an image looks like this: |
|
I used DxO to correct all of the images from the 12-24mm zoom, which has quite bad errors at 12mm. I also corrected some images from the 20mm that were especially objectionable. DxO is very good at opening up the shadows in digital photographs. It also seems to give a nice boost to saturation. Finally, it removes nearly all of the chromatic aberration.
I used the Adobe 1998 color profile and the Large, Fine quality JPG setting for all images made with the D70. Metering was set to Aperture Priority (fully automatic), and Auto White Balance was used. The results were not perfect but, on average, better than I would have obtained by fiddling. In many cases I checked the results immediately after shooting but seldom found it useful to set exposure manually. When using a digital camera, I take about five times as many photographs as when I have to pay for film and processing. The quality of the results is thereby moderately improved, and data is recorded that I would not otherwise have taken, such as shots every few paces along a street, or an 8-shot, 360° panorama. Much time is saved by not having to scan film; I used to spend about a day scanning for every day shooting. I managed my photographs by loading them into a database and coding them by contents and quality. This was a Microsoft Access database that I custom designed for myself. It allowed rapid location of specific images. The task of managing 12,000 photographs would otherwise have been nearly impossible. |
Back to Carfree Design Manual Home
Go to Carfree.com
E-mail
carfree.com
Copyright ©2000-2002 J. Crawford